 |
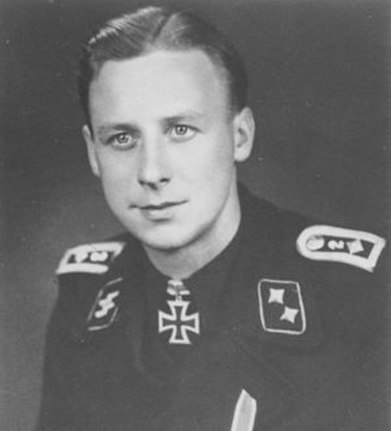
| Ernst Barkmann [1] |
Ernst Barkmanm (25 August 1919 — 27 June 2009) was one of the greatest Panzer Aces of the War World II. He is also available in the Battlefront's Flames of War game (FOW) as a warrior in 2nd and 12th SS Panzer Divisions.
There are many books and web sites presenting comprehensive information about that heroic tank commander (including two Battlefront books [3, 4]), so I will try to focus on some basic information and less know engagement he participated in, also providing references to other sources at the end of this post. I hope that after reading this entry you won't complain again about his special rules in FOW, when you meet him at battlefield next time ;)
Early Service
Ernst Barkmann was born in a farmer family in Kisdorf which lies near Hamburg. His career in SS started in April 1939 when he was admitted to SS-Verfügungstruppe (the precursor of Waffen-SS), and finally he was assigned to the 3rd Battalion of SS-Standarte Germania.
He saw action for the first time during the campaign against Poland in September 1939. He served as a machine gunner in the 9th company of the regiment. He was wounded and awarded the Wound Badge in Black. He continued to fight during the Fall Weiss campaign and earned Infantry Assault Badge.
During the Barbarossa campaign, his unit changed title from “Verfügungstruppe” to “Deutschland”, and soon after that to “Reich”. He was again wounded in July 1941 during the fighting for the Dnjepr crossings at Dnjepropetrowsk. After he recovered, he was assigned to instruct volunteers in Holland.
Panzer III Gunner and Commander
Barkmann's service as a tanker started in 1942 when he volunteered to the tank battalion of the Division “Das Reich”. He was sent to the Eastern Front in winter 1942/1943 where he became a gunner of the PzKpfw III Ausf J/1 tank commanded by SS-Rottenführer Alfred Hargesheimer. He was soon promoted to the rank of SS-Rottenführer and given the command on his own Panzer III with the tactical number 221. He was finally promoted to SS-Unterscharführer.
Franc Kurowski [2] describes the action that took place on the morning of 4 February 1943. The task of the 2nd company was to attack and take the village of Olchowatka. Barkmann's Panzer 221 was ordered to cover the left flank of the wedge formation. During the approach to the village Barkmann's crew easily took out the Maxim machine gun with a single round, but soon they were attacked by Molotov cocktails. One of the bottles exploded on the frontal armor of the tank. Barkmann jumped out from the hatch and wiped out burning liquid with his jacket. Soon after that he spotted an anti-tank gun which was only 30 meters away and firing to the remaining German tanks. He ordered to roll over the gun as the crew of AT gun started to rotate the gun to face his Panzer. Under the heavy fire from AT rifles and desperate shot from the AT gun, Barkmann's Panzer destroyed the AT gun [ehh, they had them on 4s and still missed in the defensive fire? ;)]. Soviets retreated leaving the village to the Germans. After the assault only three tanks (including the 221 tank) were still fully operational. They were ordered to return for fuel supplies. Barkmann was not pleased because one of the more experienced SS-Rottenführers was assigned to his tank as a commander. Barkmann took the role of gunner instead. During the way back at night and in deep snow the new commander lost contact with the remaining tanks and Panzer 221 bogged down in the snow [hmm, someone rolled 1 for the bogged down check ;)]. The crew was not able to free the tank.
At dawn the tank was spotted by Soviet bombers, but they didn't manage to destroy it. Soon, Soviet infantry supported by the horse-drawn AT guns appeared. Barkmann ordered to engage and defend the vehicle. After a heavy fight they destroyed three guns. By the time they had only 10 rounds of ammo left, they managed to contact incoming German tanks. They destroyed one more gun when one of the remaining 7.62 guns hit the tank and penetrated the rear deck. Barkmann ordered his men to bail out [upss, a failed fire power test = a consolation prize for Soviets ;)]. Under the fire, they were able to retreat. When they met the incoming tanks Barkmann claimed that he has to return and recapture his tank... Unfortunately for him and his crew, the Panzer III tank burned out by the time they reached it.
Panther Ace
Although, Barkmann proved to be a gifted commander and gunner before, he is mainly recognized as a commander of the Panzer V Panther tank. He became a commander of the Panther D tank after the failure of the Operation Citadel, when he was transferred to become a commander of the 4th company. He successfully fought on the Eastern front until January 1944, and he was awarded both classes of Iron Cross for his service.
Early in February, the division was ordered to France. At the beginning of the Overlord Operation in June 1944, the Das Reich Division was initially held in reserve, but when it became clear that Allies would not launch additional landings, the division was directed north to Normandy.
Fighting in Normandy was something new for Barkmann, who was more familiar with the epic-scale battles of the Eastern front. Difficult terrain of bocage forced tank commanders to fight at close ranges in small tactical groups (typically not bigger than platoon). However, Barkmann quickly adjusted to new conditions. On 8 July, his 4./SS-Panzer-Regiment 2 advanced against the US forces north from San Sebastian. Franc Kurowski [2] describes the engagement that took place in the following days. It started from knocking out a Sherman tank by Barkmann's Panther. Soon after, Barkmann's company bogged down in the artillery fire. For the next couple days the company took part in the counterattack.
On 12 July, Barkmann's Panther destroyed additional two Shermans and immobilized additional one. After that, Barkmann prepared an ambush hiding his tank and waiting for the approaching US armor forces. An they did approach on 13 July – six tanks. Firing from the concealment they managed to knock out three Shermans, while the Yanks unsuccessfully tried to fire back. Three remaining tanks disappeared trying to get to the rear of Barkmann's Panther. The Panther changed its position and engaged incoming infantry supported by AT guns. Barkmann's crew managed to destroy one gun, while the second hit the front of the Panther's turret causing fire. The crew bailed out [again the fire power test failed ;)]. Barkmann managed to pull the unconscious gunner from the turret. After a while, they decided to get back to the tank. They managed to put out the fire.
Next day, while the crew was waiting for their Panther 424 to be repaired, they were ordered to get back to the front lines and free four tanks that were cut off. The crew was given a reserve tank (which had fresh signs of the fatal fate of its previous crew). Three Panthers where able to reach the encircled tanks and breakthrough the enemy lines while knocking down three Shermans. Next day Barkmann's “temporal” Panther was damaged by artillery, but the crew managed to get it back to the workshop. Meanwhile, their 424 Panther was repaired, so they switched back tank again. Unfortunately for Barkmann, his Panther was soon attacked by US fighter-bombers, and again badly damaged. Again his crew was able to extinguish the fire. The workshop personnel worked hard for the whole night to repair the vehicle. Although they managed to that, the time required to repair it, left the Barkmann's Panther cut off from the rest of his company.
The following days in which Barkmann's crew made their way back to the remaining German forces made them famous. The action that took place at the crossroad near Le Lorey (junction with the road N172) on 28 June was further called Barkmann's Corner. You can find the description of the engagement in the Battlefront books [3,4], so I will only limit myself here to the short summary. As the Panther 424 was approaching the crossroad, it was welcomed by the German infantry reporting about incoming column of US vehicles. Barkmann sent two of his men Heinze and Corth to check the situation. They confirmed the report (Heinze was also wounded during the recon). Barkmann's Panther attacked the column from the concealment destroying two leading Shermans and supporting ammo and fuel vehicles. Soon, Panther 424 managed to destroy additional two Shermans that tried to go around the blocked road. Americans called for air support, however, the fighter-bombers didn't manage to cause greater damage. Using the cover , Shermans were able to flank the Panther. Barkmann's crew knocked out two of them until Shermans started to hit the Panther. Two rounds hit the 424 tank damaging tracks and ventilator (making real hell inside). The Panther's driver Wilke was wounded and trapped in the forward part of the tank. Although, the ammunition was running out they managed to knock out another Sherman. The Panther 424 managed to escape leaving wrecks of Shermans behind them, and towing two immobilized Panthers. It was obviously not over. Going back to the German lines took Barkmann couple of days, during which his crew managed to destroy additional tanks reaching the total number of fifteen tank kills over the course of the two days [2]. Finally, Barkmann's men didn't manage to get back with any of the three Panthers. For that action Barkmann received Knight's Cross to the Iron Cross. It is worth to mention that information about the engagement is not confirmed by the American sources. If you are interested in the topic you might read the thread at Axis History Forum [5].
Barkmann continued to fight during the Ardennes Offensive in his new Panther tank with number 401. At the end of the WWII he fought against Soviets in Austria and destroying T-34 tanks. On 12 April 1945 his Panther was knocked out by friendly fire from the Panzerfaust. Barkmann was injured, as well as his new gunner who was blinded in both eyes, and the driver. With the crew replacements, he tried to continue fighting despite the destroyed intercom. Finally, the tank bottomed out in a shell crater and had to be destroyed with Panzerfaust. All in all, together with his long-time gunner Poggendorff, Barkmann managed to travel 1000 kilometers to reach Schleswig-Holstein [2].
Career Record
During the war he destroyed or disabled 82+ enemy tanks, 136 miscellaneous AFV's and 43 AT guns [6]. He received the following awards and decorations [6]:
Barkmann in Flames of War
Battlefront introduced Barkmann as a warrior in the Cobra book [3], and further in the Earth & Steel [4]. They also provide a box set containing Barkmann's Panther A and field workshop (
GBX21).
In my opinion, Barkmann is one of the most interesting warrior characters in the game, because of his special rules. There are many characters who have "typical" special rules, e.g., re-roll failed motivation and skill tests, missed shots, etc. For Barkmann guys from Battlefront had really interesting ideas. They tried to emphasize the main abilities of the Oberscharführer:
- Ace: Barkmann was a gifted gunner when he served in Panzer III, and when he became a tank commander he also had a great gunner - Poggendorff. Barkmann always gets to re-roll misses with his Panther's 7.5 cm KwK42 gun.
- Stalker: Barkmann had a tremendous ability to use terrain features to conceal and protect his tank, what he proved many times. If Barkmann is shot at the is counted as Gone to Ground if he is Concealed and did not move in his own turn, even if he did shoot in his turn.
- Escape Artist: even in critical situations Barkmann was able to calm down his crew members and motivate them to save the tank at all costs (as you could read before). For instance, after bringing his 424 to the field workshop, he was given another Panther from reserve, and he went back to front lines. This inspired guys from Battlefront to introduce a field workshop and a special rule for Barkmann. If Barkmann is destroyed while commanding a Panther tank, place his Panther tank adjacent to the Workshop instead of remaining where it was destroyed.
His platoon may appoint a new Platoon Commander team using Mission tactics special rule as usual when they lose their Platoon Command team and continue to operate without him.
In each Starting Step when you would roll for Reserves to arrive, if there are no enemy teams within 4'' of Barkmann's Panther tank or the Workshop, roll a die. On a roll 5+, his vehicle is repaired and is ready for battle. It is no longer Destroyed. Remove the Workshop when Barkmann is repaired. Otherwise, the repairs are still progressing.
If the Workshop has been removed or captured, Barkmann is removed from the table when he is Destroyed.
Barkmann's Workshop
Barkmann's Workshop behaves a little bit like Objective. At the same time as Independent teams are deployed, place a Workshop in your deployment area. The Workshop must be in German hands for Barkmann's Panther tank to be repaired. If the enemy take the Workshop (in the same manner they would take an Objective), they capture it and the Workshop is removed from the game.
It is a nice resin model with some white metal parts like a Panther A engine and personnel member.
Modeling Barkmann's Panther
Barkmann's Panther is also one of the most beautiful models of Panther available from Battlefront. I've seen people using it as a regular Panther in their companies, just because it is so nicely sculpted.
Below you can see mine version. I didn't add much damage (although probably I should). Maybe, I will do this another day. I especially like the picture on the left, which shows the scale of the model in comparison to a regular pen ;)
Barkmann in Action
Barkmann is a lethal weapon, but it takes little time to learn how to use his Panther effectively. I have only some experience in taking him as a support unit for my infantry company. If you have experience in using him in SS Panzer companies, please leave your thoughts as a comment - I'll try to update the list of hints.
When you use him within SS-Panzergrenadier company, it will cost you 275 points. If you compare it with 240 points for the full SS Panzergrenadier Platoon with two Panzerfausts, it is quite clear that you have to make good use of his ability so it pays off. I would recommend to consider the following issues:
- Tank Sharpshooter - Barkmann is extremely effective in taking out single tanks. You can consider using him to hunt for Company HQ or Platoon HQs. The first one is more important when you are fighting against numerous trained tanks, e.g., Soviets. Sometimes the only option to win the game is to take down the Company HQ and then destroy more than half of the platoons. Of course knocking out independent team is not easy because it can join a platoon, so you need to position Barkmann in such a way that it can see only the tank you would like to destroy. Then, with the re-rolled missed shot, you are really close to kill the enemy.
- Area Denial - when you place Barkmann in concealment and with wide range of fire, most of the commanders will try to avoid him and choose another place to attack. You will stop most of the heavy tanks (maybe instead of King Tiger).
- High-risk missions - I think that you should risk much more when using Barkmann than you normally do (I'm still failing to do so in many cases). It is very likely that Barkmann will survive most of the hits, and if not, well, he will be back sooner or later. If you are agressive, your opponent will attack under pressure.
- No silver bullet - What Barkmann definitely can't do is to defend your infantry against the hords of enemy platoons. You have to help him with AT guns or couple of Panzer IV or StuGs. I played couple of missions when I destroyed many tanks with Barkmann waiting for StuGs that never came from reserves, and as a result being overwhelmed by massive enemy.
- Smoke catcher - you can consider keeping Barkmann far away from other forces, when your enemy has artillery. In many cases he/she will try to smoke the Barkmann. If he is isolated, you will be forced to move, but rest of your forces can operate easier.
- Air-attacks magnet - If your enemy has air support in most cases he/she will use it against Barkmann. Great for you! You will probably keep Barkmann's Panther in concealing terrain and in Gone to Ground position, so it is a very difficult target. What is more, even if your enemy will be able to destroy it, still it is quite probable that not for long.


References
Ernst Barkmann in Wikipedia, http://en.wikipedia.org/wiki/Ernst_Barkmann, http://en.wikipedia.org/wiki/File:Barkmannernst.jpg.
Franz Kurowski, Panzer Aces III, German Tank Commander in Combat in WWII, Stockpile Books, 2010.
Steven Ptak, Phil Yates, Ken Camel, Michael Haught. Cobra: The Normandy Breakout. Battlefront Miniatures Ltd., ISBN: 0-9582755-6-4, 2008.
Wayne Turner, Steve Bernich, Alessandro Fasolo, Rich Hamilton, Todd Powell, Ken Camel, Michael Haught, Phil Yates. Earth & Steel: The German Defence of France June-September 1944. Battlefront Miniatures Ltd., ISBN: 978-0-98645140805, 2010.
Axis History Forum, http://forum.axishistory.com/viewtopic.php?f=50&t=156158.
Ernst Barkmann at www.panzerace.net, http://www.panzerace.net/english/pz_per_bar.asp.
Ernst Barkmann at www.achtungpanzer.com, http://www.achtungpanzer.com/gen5.htm.
 I don't know if you agree with me, but for me warriors add some flavor to army lists in FOW - however, they make also a really difficult job for Battlefront to make briefings balanced after introducing them.


