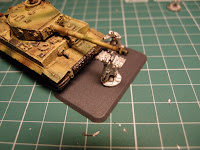
Today I would like to give you a short report from making a bunch of such scenic markers for my German forces.
Bail out
Making bail out markers is straight forward thanks to Battlefront's dismounted crew sets (e.g., German dismounted tank crew GSO196). All you have to do is to place couple of these guys on a nice base.
It is also a good idea to paint edges of the base to clearly mark that it is a marker and not a regular infantry base. For bail out markers I decided to paint red-white stripes. You can see the results in photo on the right hand side and couple more photos in Gallery at the end of the post.
Bogged down
When it comes to bogged down markers there is no ready to go solution in Battlefront offer. There is more room for new ideas :)
I decided to create three types of such markers:
- track repairing - guys trying to repair the track of a tank;
- rocky area - your vehicle came into a pile of rocks and one of the crew members has to navigate it back to the safe ground;
- too much mud will make you stuck - a simple universal marker.
First of all we need to prepare some spare parts of vehicles and crew members. Probably all of you have many of these things that were not used.
Now it is time to convert figures, so they look more like tank crew members. I used the German soldiers from the artillery group and swaped their heads with tank commanders from tank blisters.
Now, it is time to plan the layout... For the mound of mud I decided to use a piece of foam to model the shape, because it should make an impression that vehicle stucked in mud for good.
Now, it is time for basing. Standard procedure. Sand plus PVA glue. To model mud I use the sand from sea side beach. It has really tiny grains.
Base coat with chocolate brown and dry brush with beige brown and german cam. beige.
A little bit of oil-paints wash (a mixture of black and brown)...
Mud effect. I decided to model clay mud. For that purpose I use Vallejo natural sienna pigment. The process takes two stages. First, I mix the pigment with the matt varnish and goes all around. When it dries it looks like dry clay. At the top of the mound I would like to have fresh wet clay. The solution is simple. Mix pigment with gloss varnish and apply it only on the top of the mound.
And this is how the markers look just before painting the edges to black-yellow stripes...
Gallery
Couple of ready to use markers...


I love the bogged down markers, great ideas. Especially the one with the track.
ReplyDeleteInspirational post. Great work.
ReplyDeleteCheers
What a great idea. I love your originality.
ReplyDeleteThanks guys :) It's good to know that I'm not the only one who likes such tiny (put important) things ;)
ReplyDeleteI love it! It was very clever to not only have the stripped colors on the base to denote that there is something different about the stands (and as such they will not be confused with combat stands), but to have them be different. The black and yellow of the bogged markers makes me think of "under construction" signs, which is appropriate given what the stand is indicating. Kudos!
ReplyDeleteThanks :) Yeap this was the idea black-yellow = under construction; white-red = red cross
DeleteApologies, I thought that I had previously commented on this post until I found it again. This is a really great idea that is wonderfully executed. I like how you have documented the process to demonstrate how to recreate these markers. Great painting and nice details.
ReplyDeleteMoW
These are fantastic. I may have to make some once I finish my company.
ReplyDeleteStumbled across these during a quick Google search I'd thought of doing something similar. Very clever, especially overlapping the tanks onto the markers.
ReplyDeleteNice idea... I think one with a big old knarly fallen log would be good as its always hedges and wooded terrain I bog down on!
ReplyDelete